.avif)


If you’re someone who loves to travel but the thought of planning a trip sounds like a second job or makes your head explode, then Google Maps Trip Planner is for you.
Time saving, customizable, and perfect for solo or group travel, Google Maps Trip Planner should be on everyone’s pre-trip check list.
Keep reading for an in-depth guide on how to create a personalized map for your next trip!
Step 1: Create A New Google Map
To create a Google Map sign into your Google account on your desktop or laptop and click on this link.
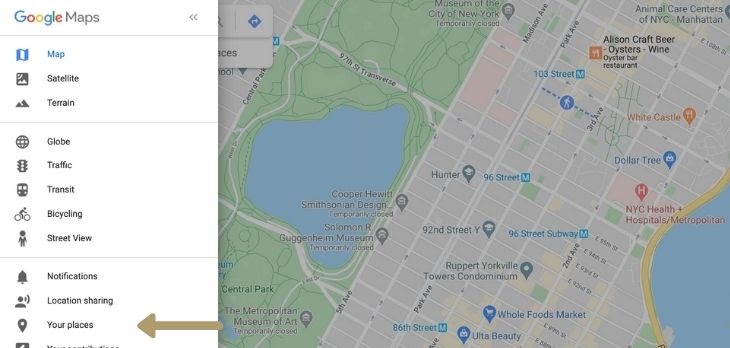
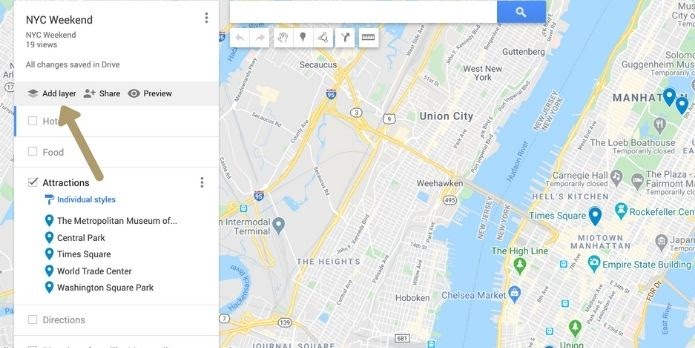
This will take you to the general maps page. Once you’re signed in, click on the three bars icon in the top left corner and select “Your Places” from the menu.
Click on “MAPS” on the top right of the page, then click on “CREATE MAP” at the bottom of the page.
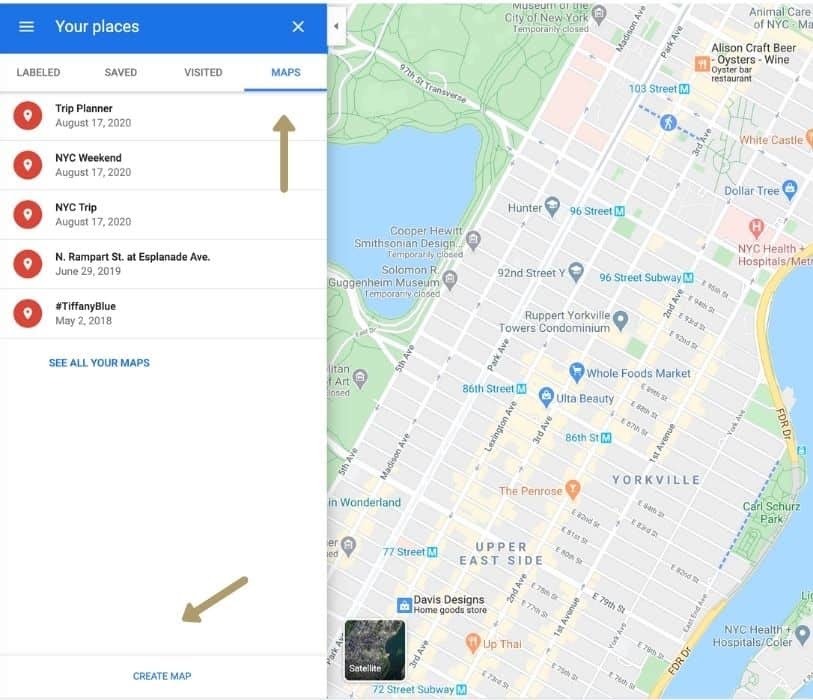
This will prompt you to the overall map view of your new map!
Rename your map by clicking on “Untitled map” on the top left and enter a new name and description. I recommend being extremely detail orientated when planning, especially if traveling with a group.

Awesome! You have just created your very first Google Map.
Step 2: Break Your Map Down Into Categories
Create a list of all the things you want to see and do on your trip to add to your custom map. Here are the categories I typically use:
- Restaurants & Bars
- Cafes
- Shopping
- Cities & Towns if you’re on a road trip
- Hotels if you’re staying at more than one
- Activities (beaches, hikes, Instagram spots, wineries, etc)
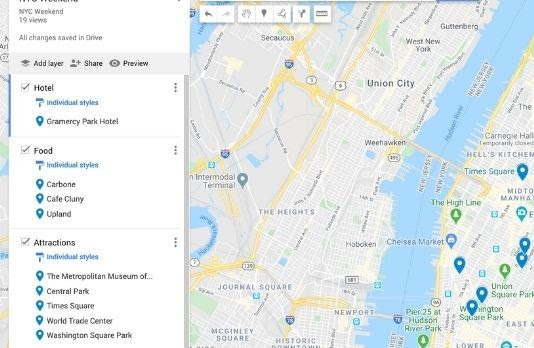
How To Add Categories
Now that you have identified what categories fit into your trip, it’s time to create them.
Create a category by first creating a layer. Click “add layer” and name your category. Repeat this step until you have all your categories' names.
You can always go back and change the name by clicking on the three dots next to the category’s name.
Step 3: Input Your Inspiration Onto Your Map
Now the fun stuff, actually adding in all your travel bucket list activities.
Pick a category you first want to add items to, like Food. Make sure only Food is checked and uncheck all the rest. This is important because if a box is checked then the item you’re trying to add might go to the wrong category.
Start typing in the name or address of the location you’d like to visit into the search bar at the top and click enter.
Then click “add to map”.
Keep repeating this step until all your items and activities are added. If moving onto a new category, remember to uncheck all other boxes!
What If I Can’t Find My Location?
Don’t panic! If there’s a location that you want to take an Instagram photo of but it’s in the middle of nowhere, you can still add it to your categories. For example, Central Park in NYC is huge, and unless there’s a monument or a bridge, a location pin other than Central Park as a whole won’t show up on Google Maps. However, there are so many places in Central Park that are Instagram worthy that don’t show up on the map. For this, follow the instructions below.
First look on the map and pinpoint the marker. I recommend opening another Google Map tab for this.

Once you place a gray pin on the map, coordinates will appear at the bottom of the screen in a white box like the one above.
Copy and paste the coordinates into your map view finder.
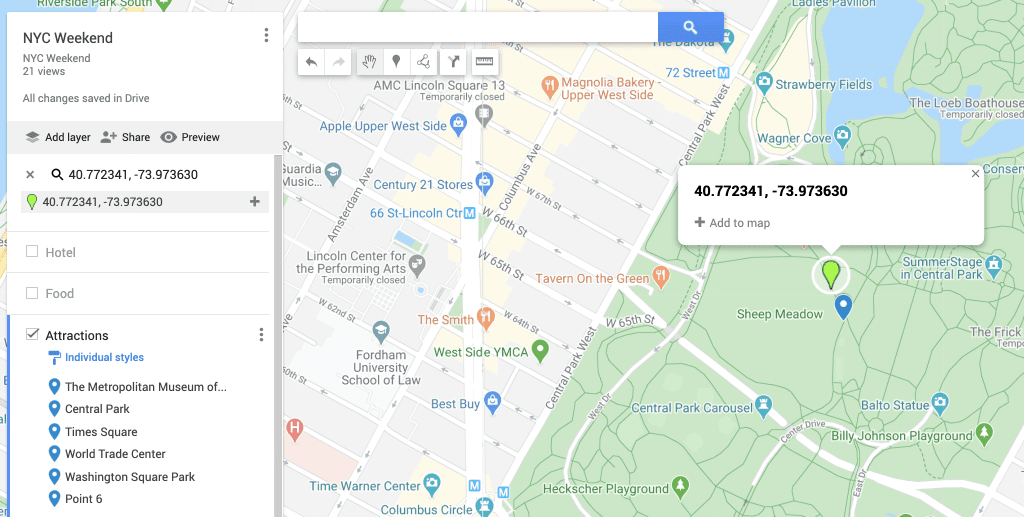
Click add to map and rename it.
Alternatively, another way to add pins to your map is to click on the marker under the search bar, next to the hand icon. Place it anywhere on the map and rename it. This works if you already know the exact spot of the marker.
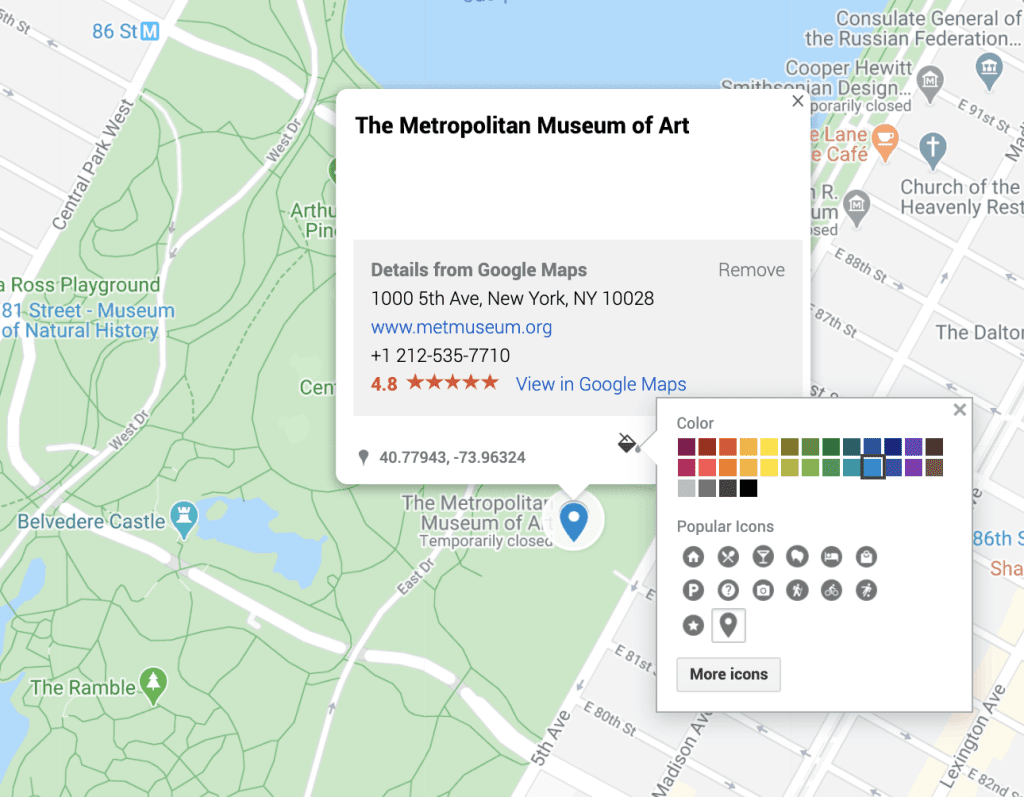
How To Customize Your Location Markers
This is a really fun and unique way to get creative with your maps. If you’re traveling with a group this will be especially helpful as you’ll be able to easily identify markers based on which travel buddy added them.
To customize a marker, click on your item and then the “Paint Can” as shown below. A box pops up with color options and icons.
To add photos or videos, use the camera icon. To make additional notes for each location marker, click on the pencil.
If you ever need to delete an item, simply click on the trash icon in the pop-up box to erase it from your map.
Ideas For Creative Customizations
Even if you’re not big into customizing, I would recommend changing the pins to a color that pops. You’ll most likely be looking at the pins on your Google Maps app and the blue default pins tend to blend into the screen.
Here are some of my favorite way to customize colors and icons:
- Color code by category and sub-category
- Color coding restaurants from shopping, for example, will make it much easier to differentiate categories. Additionally, you can label sub-categories like formal restaurants vs. casual.
- Assign colors based on priority
- Chances are you have a lot of things you want to see and do. Try listing out your top 10 must do’s and color code them one color. That way it’s easier to visually see what’s most important to you. Then, color code the next 10 things that you want for when you finish the first 10.
- Color code by travel buddy
- Planning a girls’ trip and have a million suggestions from the group? Assign each friend their own color so it’s visible who wants to do what. This way there aren’t multiple maps floating around and everyone stays on the same page.
Once you’ve added any colors, notes, and icons into the listing, save the listing and you’ll see it’s been added to your layer. In most cases, things like the company’s website, phone number, address, and rating will already be embedded into the box.
Step 4: Start Creating your Itinerary
Alright, you've done a lot of work already (go you!). Now it’s time to take a look at all your items and create an easy-to-follow itinerary using your Google Maps trip planner.
I like to start off by creating a Google doc and start listing out my days. For example, on my 10 days in France itinerary, I listed out “days 1-3 Paris” and then “4-6 Reims”.
Looking at your visual map is a great way to see where the majority of your pins are and how much time you’ll need to spend at each location. If there’s a cluster of pins in a certain location you’ll know to spend the day there. This will save you time and money on Ubers and transportation.
I love this method as it works great on road trips as well. If you don’t know how much time you should allocate to places, visually seeing pins on a map is a great starting point.
Step 5: Get Directions and Distances
Another great way to plan how much time you’ll need at a destination is looking at directions from point A to B. This will show you driving directions and you’ll be able to time your trip better.
If you’re going on a road trip or planning on driving anywhere, especially in a different country, I highly recommend looking at the driving distances between all your points.
To do this, first, click on your item and then click on the arrow next to the trash can icon. This will automatically create a new layer and add your points.
Additionally, if you have a box created like my “Directions” which I labeled myself, you can type in the locations.
For example, Pin “C” is empty. You will type in “Pastis” and it will auto-populate the restaurant’s name.
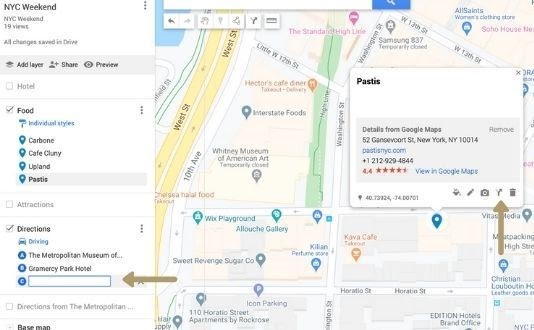
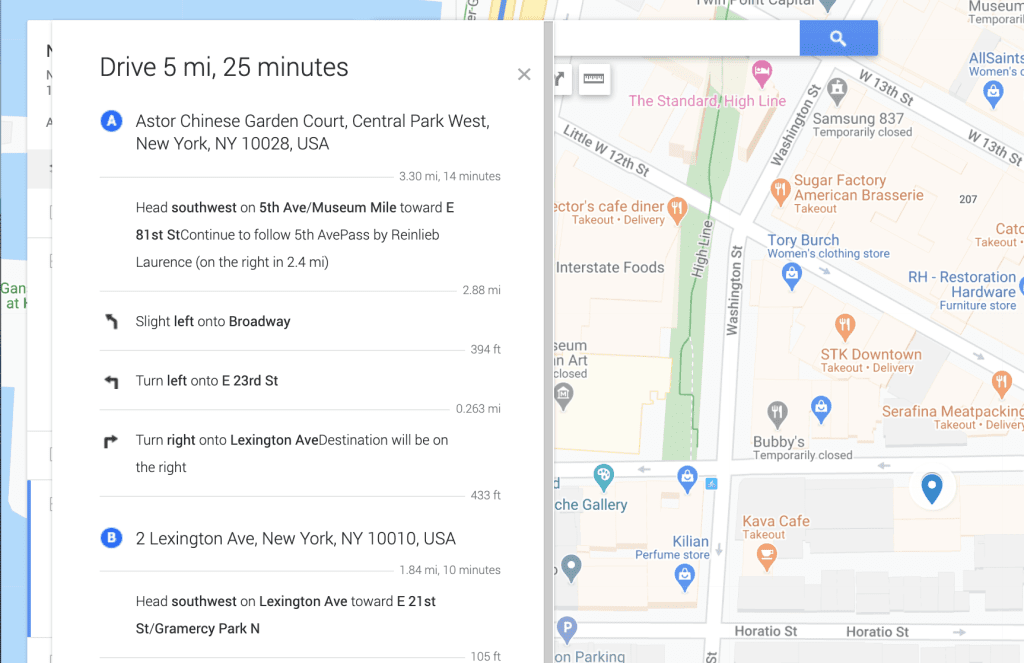
Then to get step-by-step directions, travel times, and walking directions, click on the three dots on the directions layer and select “Step by Step Directions.” You’ll see a box pop-up (see below) that gives you the route along with the total mileage and driving time.
Word to the wise, Google maps isn’t 100% accurate everywhere in the world. In Greece, Google maps directed us to turn left when left meant driving off a bridge. Always ask for the best way to get around if you’re in a different country.

Great! Now you have your directions and can start making decisions on your itinerary.
Step 6: Book Hotels & Finalize Itinerary
You’re almost at the finish line! Now that you’ve done all the heavy travel planning, it’s time to book accommodations.
You can either choose a hotel based on where you’ll be spending the most amount of time, based on your pin cluster or go with that travel bucket list hotel that might be more on the outskirts. Regardless, knowing that you have a realistic sense of how long things will take you can prioritize your timing.
I love using Airbnb and Bookings.com. Never tried Airbnb? Use my link and get $35 off your first stay. Explore the “Luxe” collection, talk about dream homes.
Step 7: Share Your Map With Travel Buddies & Friends
Google Maps Trip Planner makes sharing, collaborating, and editing between friends so easy. You can share it with your friends, mom, aunt, co-worker, etc.
I’m always getting asked where I went or if I can send them an itinerary, and sharing my Google Maps trip planner makes that super easy.
Here’s how to do it. To share your map, click on the “Share” button under the main title of your map. Then at the bottom of the box, add your friends’ email addresses into the “Invite People” bar. On the right-hand side where the pencil icon is, make sure that “Can Edit” is selected. Then press Send.
You have the ability to send it through email or social media platforms like Facebook, as well as restrict the type of access you’re granting to edit or comment only.
Love or hate a place you went to? Add it into your notes and save it for later when you share your trip with friends and family.
Step 8: Sign Into Google Maps On Your Phone
Last but not least you need to have the Google Maps app on your phone for when you’re traveling.
Then, be sure to sign in with the same Google account that you used to first create the map on your desktop. Once you’re signed in, go to “Your Places,” and scroll to the last tab on the right called “Maps.”
What If I Have No Wifi or Data on My Mobile App or Web Browser at My Destination?
This happens. Like I mentioned before, the Greek Islands were definitely a transportation challenge. To access your maps offline on your mobile phone you’ll need to download Google Earth.
To access your Google My Maps offline, follow the below steps:
- Download the Google Earth app on your iPhone or Android phone.
- Find your Google Maps trip planner on your desktop, click on the three dots next to your map’s title and select “Export to KML/KMZ.”
- In the pop-up, leave the boxes unchecked and just click on Download.
- Email the downloaded file to yourself and open that email up from your phone.
- When downloading the file onto your phone, you will have to select the Google Earth app option to open it there.
Time to explore! Now that your Google Map is set and ready to go, it's one less thing you have to worry about once you arrive at your destination. Enjoy!